Thursday, January 26, 2012
New Product Class Cards
There were two versions of this card that class attendees could choose from because I couldn't make up my mind! lol. The colors are perfect plum, blushing bride and sahara sand card stock. It uses the same colors of ink along with elegant eggplant. We used the Bordering on Romance set as well as Teeny Tiny Wishes. The adorning accents edgelits were a fun way to cut the edges.
colors ~ blushing bride and riding hood red
tools ~ pinking hearts border punch, heart of hearts and fashionable hearts embosslits, pleated satin ribbon (I just love this ribbon!). Adorning Accents embossing folder adds a fun heart texture to the inside.
The light pink layer is from the twitterpated designer paper
Sentiments are from Teeny Tiny Wishes and Delightful Dozen.
Our next project was a fun maze birthday card made with the new A-maze-ing set. The colors are white, pacific point and tangerine tango and early espresso. The maze actually works! I found the best way to adhere it to the card is with Tombow liquid glue. I used the 1" square punch to create the forked edge on the sentiment banner.
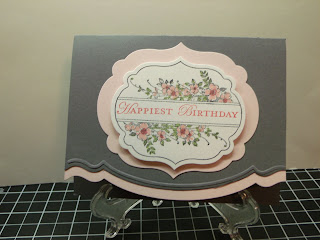
Our final card was so elegant! I think pink pirouette and basic gray look great together. The flowers are colored with certainly celery, pink pirouette and regal rose. I just love that Apothecary Art set with the Labels Collection of framelits. Again, the Adorning Accents edgelits and embossing folders help create a unique edge.
Hope you enjoyed looking at the cards as much as we enjoyed making them! Please see the calendar link on my right side bar to find out when my next class is - you won't want to miss it!
Happy Stamping! Mary
Wednesday, January 25, 2012
Get Well Mark!
My dear older brother Mark had a spill on his bike on Friday the 13th. He thought he could take a 20mph curve at 40mph - NOT! His serious lack of judgement landed him in the hospital with a concussion and broken ribs. When we got together for coffee last we we argued over who should pull mt walker out of my car. He stated that I am more disabled, even if he is in more pain. Well, I hope you heal well bro!
~ Mary
Monday, January 23, 2012
Framed Window
I made this very simple card to send my in-laws last week.
The flower images are from the Occasions Mini set Bordering on Romance. I colored them with blender pens and pastels for a nice soft feel. The sentiment from the Thank You Kindly set is shown through a punched window. I used the designer frames embossing folder to add texture around the window. These embossing folders are in the SAB brochure and you can earn them for FREE! Finally I added some pearls to add a touch of elegance.
Happy Stamping! Mary
Friday, January 20, 2012
Sale-A-Bration with Dyed Velvet Ribbon
Sale-a-bration starts next week. This card is made with one of the exclusive sets you can get for FREE with a $50 order. It's made with the luscious Mocha Morning specialty designer paper and vanilla velvet ribbon that's been dyed black. The images are embossed in black on crumb cake paper. Thanks Cheryl for sharing this card with me. I'm putting in an order next week, so let me know this weekend if you'd like to add to it. If you spend $50 you could get this SAB set for free.
Happy Stamping! Mary
Monday, January 16, 2012
So Sweet!
Friday, January 13, 2012
More Telescoping Circles Cards
Do these cards look familiar? They are basically the same as my project 2 card from my Jan Club, but I changed the sentiment and card stock colors. The anniversary one I'm giving to my good friend, Cheryl, who's celebrating 20 years (or 21?) of marriage this weekend. Congrats, Cheryl and Pat!
Here are more cards that are reminiscent of my Jan Club Project 1 card with a few color changes and more hearts. I'll probably send these as special Valentines.
Happy Stamping! Mary
p.s. I just saw this version of a telescoping card (with the new tea set) that is really neat. Check it out!
Here are more cards that are reminiscent of my Jan Club Project 1 card with a few color changes and more hearts. I'll probably send these as special Valentines.
Happy Stamping! Mary
p.s. I just saw this version of a telescoping card (with the new tea set) that is really neat. Check it out!
Thursday, January 12, 2012
Jan Club - Telescoping Circle Cards
These are the two projects we made at my club on Wednesday. Both use new sets from the Occasions Mini Catalog. We water colored on one and embossed the heart image on the other.
For Telescoping Circle Cards you need:
one scallop circle (big shot die)
two 3-1/2" circles (big shot die); one can be out of dsp
one 3" circle (big shot die)
one 2-1/2" circle (punch)
3 brads
a small piece of ribbon (2-3")
and stamps/ink of choice
embossing folders, optional
Project 1 - Telescoping Circles Card
Supplies:
sets- Totally Amazing, short & sweet
cs- rose red, whisper white
ink- rose red craft & classic pads
access- big shot, scallop circle & 3-1/2" circle & 3" circle dies, fashionable hearts embosslit, perfect polka dots & adorning accents textured impressions embossing folder, 2-1/2" circle punch, 1/16" punch, paper piercer & mat pack, silver brads, rose red seam binding, heat tool, embossing buddy, clear embossing folder
Project 2 Telescoping Circles Card
Supplies:
sets- Bordering on Romance, Teeny Tiny Wishes
cs- blushing bride, whisper white, twitterpated dsp
ink- Blushing Bride, pad & marker, Basic gray, riding hood red, pear pizzazz, and island indigo pads
access- big shot, scallop circle & 3-1/2" circle & 3" circle dies, adorning accents textured impressions embossing folder, 2-1/2" circle punch, 1/16" punch, paper piercer & mat pack, gold brads, blushing bride stitched poly ribbon, aqua painters
These are really easy and fun to make. Be careful they're addicting!
Happy Stamping! Mary
Tuesday, January 10, 2012
Sneak Peak Card for 1/19
About a week ago my friend Cheryl and I were playing with our new mini catalog products and I made this card. Isn't it lovely? We will be making it at my upcoming class on 1/19. The edgelits are a little tricky to use, but the framelits are soooo easy. Come try them out and see what you think.
Happy Stamping! Mary
Sunday, January 8, 2012
Framelits Labels & Apothecary Art by Cheryl
Thursday, January 5, 2012
Occasions Mini Catalog is Live!
Tuesday, January 3, 2012
Soccer Coach Thank You Cards and Gift Boxes
My son's soccer coach sent out an e-mail that she wanted to get the team together to hand out trophies and pictures at a pizza party a couple weeks before Christmas. No one had collected for the coaches so I sent out an e-mail that I'd make cards for the boys to sign and little boxes for cash donations. I pulled out my retired and well used, "I love soccer" and "wonderful words" sets and made these thank you cards and boxes. Everyone brought cash to the end of the season party and I divided it between the two boxes (which were the perfect size). It was the easiest coaches thank you I've ever done! The best part was that the coaches were female and really seemed to appreciate the handmade gift box and card.
Last Fri I went to my friend Cheryl's and we played with product from the upcoming mini. Unfortunately I have been sick with a flu bug, but am starting to feel better. I have photos to post in the next few days.
Happy Stamping! Mary
Subscribe to:
Posts (Atom)