Thursday, June 24, 2010

Kiss-It-Good-Bye Class


This is a 3x6" card. I learned how to make a Slick and Slide card from Stampin' Success (a monthly publication that SU demonstraters get free). When I first saw the Voila set, I knew it'd be perfect to try out the Slick & Slide technique. I first designed this card for my club in May 2008, then decided to use it in this class since the set is retiring.

Supplies:
sets- Voila
cs - real red, whisper white
ink- basic black pad, real red pad, river rock pad, blush blossom marker
access- watercolor pencils, blender pens, aquapainter, my way punch, 1/16th handheld punch, silver brads, dimensionas, corner rounder, Tombow multiuse glue


My inspiration for this card came from Patty Bennett's card (ok, I only changed the greeting and added the inside sentiment!). The printed window sheets and the cottage wall paper go great together.

Supplies:
sets- Watercolor Trio, Favorite Thoughts
cs- rich razzleberry, cottage wall dp, whisper white
ink- old olive marker & pad, rich razzleberry marker & pad
access- fantasy flower printed window sheets, scallop oval punch, razzleberry gg ribbon, paper piercer & mat pack, fire circle rhinestone brads, sponge


It's so fun to brayer the Bridal designed paper. the foil part resists the ink and leaves a beautiful design. I'm going to use this paper in classes some more until it's gone because it's just so darn beautiful!

Supplies:
sets- Close As A Memory, Think Happy Thoughts
cs- handsome hunter, bridal designer paper, whisper white
ink- handsome hunter marker and pad, rose red marker and pad
access- brayer, 1-1/4" & 1-3/8" circle punches, tag corner punch, dimensionals


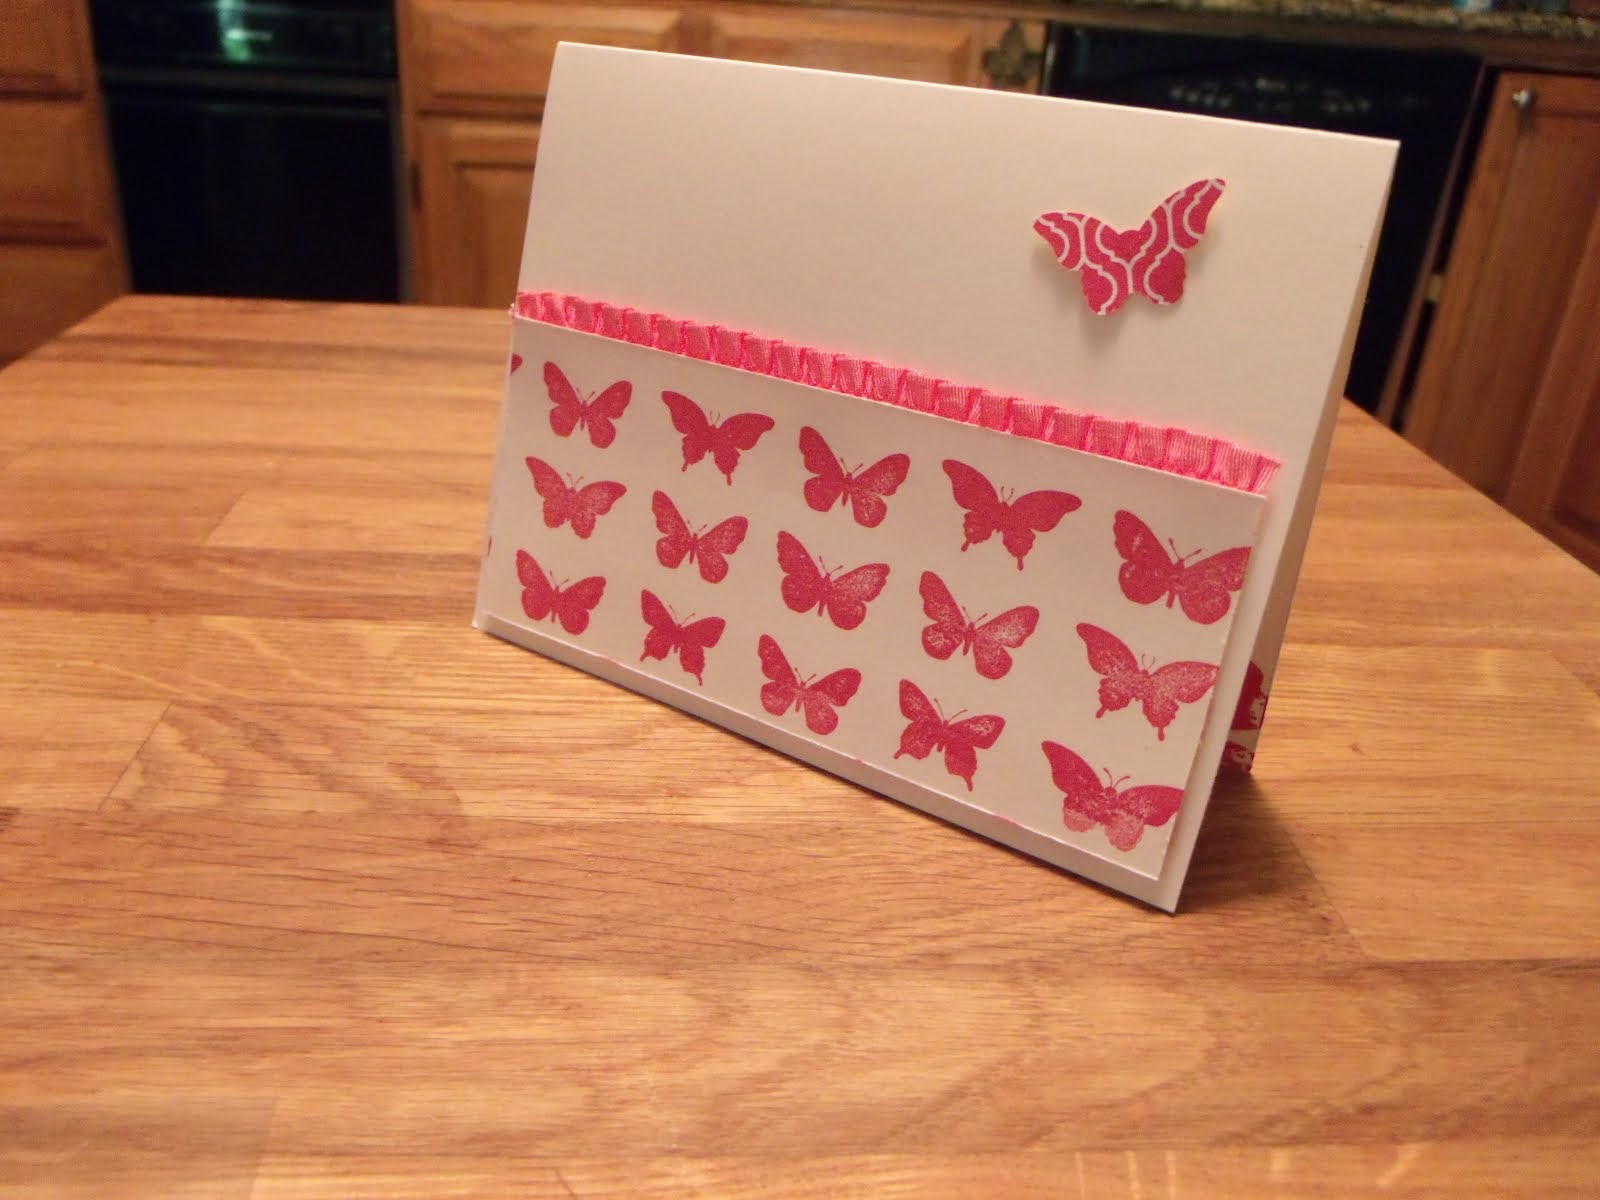
This is a super easy peasy gift card holder. I saw this idea on Barbara Smith's blog.

Supplies:
sets- wow flowers
cs- ruby red dsp (from the Hostess Level-1 Paper Pack of 6x6" dp), ruby red scraps, whisper white
ink- ruby red pad, white Signo gel pen
access- sponge, small oval punch, small & large tag punch, trio flower punch, horizontal slot punch, bone folder, white gg ribbon

These are the cards we made in my class last Friday. We used sets and items that are retiring. Wed, June 30th, is your last chance to order from the current catalog. You can begin ordering from the new catalog at Noon on July 1st.

New Lights!


Our new chandelier finally arrived - Yippeeee! Everyone at class today noticed how nice and bright it is at the stampin' table now. Dave installed it along with a little lamp over our new couch, two hallway lights and a new light in the front entry (no photo). I'm so excited about the new lights. Unfortunately the light above my kitchen sink is not working now! Dave says the balast (?) is broken and he'll have to replace it.

Tomorrow or Monday I'll post the cards we made in the Kiss-It-Good-Bye Class. Next week I'll post some of the swaps I've been receiving.

Do you want to know the really exciting news I have? I received my new box of catalogs today! I'm so glad they came and will be here for my New Catalog Open House on Sat. July 10th. I received my complimentary copy before we went to Yosemite. I got to peruse it for a whole week, whenever the boys & Dave went hiking. I'm already getting my wish list together.

Happy Stamping! Mary

Monday, June 14, 2010

My Swap


This is a card (or rather, 10 cards) I made for a swap this week. I just love this set! I liked it without the butterfly, too, but had to add another layer to follow the swap rules. I can't wait to get the swaps from across the US!

Supplies:
set- elements of style
cs- kraft, vanilla
ink- chocolate chip pad
access- big shot, beautiful wings die, watercolor wonder crayons, aqua painters, vanilla hodgepodge hardware, designer label punch, chocolate chip satin ribbon, dimensionals

Happy Stamping! Mary

Saturday, June 12, 2010

Grad Card for Matt


Our good friend's son was graduating from high school and my husband wanted to get him a gift card to the school store where he'll be attending college. I saw this really cute grad card online the other day (the red and black one pictured above). It's made similar to the way I made a stand-up explosion card for my club a couple years ago. So, after watching Kelly's video and pulling out my directions for the stand up explosion card, I made it.

Unfortunately, the pocket is only big enough to hold money, not a gift card. So, not to be deterred, I made a few alterations and came up with the blue card above (his college colors are blue and white).

Then a couple weeks later I saw a video tutorial which is similar to the card I made. Since I haven't attempted making a video yet and am impossibly unskilled with all things computer, I am just giving you the link here. I really like her method of making this card. Dawn has an interesting way of making a tassel that I haven't tried yet.

Supplies/Directions:
Go Grad stamp set
Brilliant blue and whisper white card stock
basic black and brilliant blue pads
watercolor pencils and blender pens
paper cutter with scoring blade
crimper
sticky strip & snail
tassel (I couldn't find one to purchase, so I made one out of embroidery thread)
wide oval punch
1/4" brads (I used white), mat pack & paper piercer
dimensionals

* 4-1/4 x 9-1/2" brilliant blue card stock for card base
hold in landscape mode and score at 3-1/2", 5-1/2" and mark the top and bottom at 7-1/2"
score an "X" centered over the 5-1/2" score line from the bottom and top of the 3 1/2" score line to the bottom and top of the 7-1/2" score line.

* 4-1/4" wide x 3-1/4" high brilliant blue card stock for front pocket
add sticky strip to three sides and make a half punch with the wide oval punch. Run this through the crimper, then attach the bottom and sides.

* 4" wide x 1-1/2" high whisper white card stock. Stamp sentiment in blue and feet image in black, color, layer onto blue crimped piece using dimensionals

* 3-3/4" wide x 3" high whisper white card stock; stamp and adhere to back for a place to sign.

Have fun making this cute card! Leave me a comment with a link to the card you make if you try it.

Happy Stamping! Mary

Thursday, June 10, 2010

Masculine Technique Class


These are the four cards we made at my Masculine Technique class last Friday. I learned the Faux Batik method from Stampin' Success a great publication SU demonstrators get free every month. The herringbone technique I learned from Dawn's great video. We used a piece of Stmpin' Up's sticky page instead of the carpet tape. My boys used to play Club soccer and we were always needing money holder cards for the coaches so I designed a money holder card using an 8.5 x 6.25" piece of card stock. I knew it would be perfect for the new Go Graduate set from the Summer Mini catalog. It fits perfectly into SU's small open ended envelopes (or a cheap regular envelope that you buy at the grocery store!). The 8.5" card stock is scored at 2" & 5.25". The 2" side is folded in and brads or eyelets are added to create a pocket for the money. Then the 3.25" side folds over it and is decorated. The finished card is 6.25" wide x 3.25" high. My downline, Cheryl, came up with the great silhouette bird card.

Faux Batik Technique Directions:
1. Stamp image with Versamark pad & heat emboss with clear embossing powder
2. Wet the paper and use sponges to add color to the paper (we used classic pads, but you can use ink refills or watercolor wonder crayons, too). Be sure to add lots of color because that is what makes the image pop. Colors will diffuse and lighten as they dry.
3. Place paper between 2 sheets of copy paper and iron to remove the embossing (like the wax is removed in the batik process)
4. We used Mulberry paper because of the great veining in it makes it look like cloth. However, you can try tissue paper or card stock, too.


SUPPLIES:
Project 1 - Celebrate Card (herringbone technique)
sets- Birthday Block (Summer mini), Voila, Celebrate Everything
cs- chocolate chip,creamy caramel, vanilla, spring showers dp
ink- chocolate chip pad
access- big shot, top note die, sticky page, twill tape, 1/16" handheld punch, vintage brads

Project 2 - Silhouette Bird Card
sets- inspired by nature, of the earth, short and sweet
cs- garden green, night of navy, glossy white
ink- garden green and night of navy pads
access- big shot, top note, xl 2-step bird punch, word window and modern label punch, sponge, dimensionals

Project 3 - Tropical Card (Faux Batik technique)
sets- do the hula (retired, can substitute tropical party from the summer mini)
cs- taken with teal, old olive, whisper white, white mulberry paper
ink- old olive, taken with teal and always artichoke pads
access- ee buttons, mini glue dots, linen thread, clear ep, sponges, copy paper

Project 4 - Graduation Money Holder Card
sets- go graduate
cs- crushed curry, night of navy, whisper white
ink- basic black pad, silver encore pad
access- watercolor pencils, blender pens, crop-a-dile, eyelets, gold glow smooch spritz, navy gg ribbon, mini glue dots

Happy Stamping! Mary

Monday, June 7, 2010

Feminine Technique Class

None of the colors on the Watercolor Trio card are retiring - woohoo!

Isn't it cool the way you can create a frame using the eyelet border punch? I learned how to do this from Stampin' Sucess, a magazine for SU demonstrators. It's not that hard, but takes a little practice. Also, you have to use particular dimensions and start in exactly the right place.

Originally I designed this Big Buckle card using melon mambo card stock since that's one of the colors in the Razzleberry Lemonade designer paper (which I used on the belt). Since Pink Passion is a retiring color and is very similar to Melon Mambo (card on left uses pink Passion; card on right uses Melon Mambo), I used that color for my class. I also changed the belt color from Pretty in Pink to Crushed Curry since curry is retiring.


We used the wing of the 2-Step XL Bird punch to create tulips. If you put the straight side of the wing facing out it looks like a tulip, but if you put the curvy side of the wing facing out it looks more like a rosebud. We stamped images from Flight of the Butterfly on the inside of the tulip card.


I started to blog my Masculine Technique Class and realized I still hadn't written a post for my Feminine Technique Class! So I'm posting these photos today and will post the masculine class in a couple days and then a fancy fold grad card I made for a friend's graduating son.

SUPPLIES
Project 1 - Hummingbird Card
sets- Elements of Style #120045 $19.95 cm
cs- basic gray, pixie pink, very vanilla
ink- basic gray pad, pixie pink pad, markers: brilliant blue, orchid opulence, garden green
access- eyelet border punch, basic gray taffeta ribbon, dimensionals, paper snips

Project 2 - Big Buckle Card
sets- circle circus
cs- pink passion, whisper white, crushed curry, razzleberry lemonade dp
ink- pink passion, crushed curry & rich razzleberry pad and marker
access- word window & scallop circle punch, paper piercer & mat pack, filigree designer brads, fire circle rhinestone brads, curry polka dot grosgrain ribbon

Project 3 - Watercolor Trio Card
sets- watercolor trio #120084 cm $16.95 cm
cs- kraft, whisper white
ink- rich razzleberry, melon mambo, & pumpkin pie pads
access- wide oval, scallop oval and scallop border punch, kraft taffeta ribbon, gold glow smooch spritz

Project 4 - Tulip Card
sets- flight of the butterfly
cs- lavendar lace, mellow moss, whisper white, & scraps (mellow moss, pixie pink, pretty in pink, lovely lilac, lavender lace, apricot appeal, & barely banana)
ink- lovely lilac pad
access- big shot, top note, perfect details texturz plate, xl 2-step bird punch, sponge, dotto, crop-a-dile, delphinium ribbon (retired)


Happy Stamping!
Mary

Wednesday, June 2, 2010

Cards From Demonstrator Shoebox Event in Vacaville


Inspired By Nature - on Denise's sample board

Simple Friendship - on Denise's sample board

Flight of the Butterfly - on Denise's sample board
Cards below are the cards we made. It's so much fun to stamp with a great group of gals.


I went to a demonstrator event last month, but one of the demonstrators in our group couldn't attend so I told her I'd take photos. Here are the photos Lynda!

Happy Stamping!
Mary

Tuesday, June 1, 2010

Last Chance List


The Last Chance List of Retiring stamp sets came out today! Can you guess which set from this card is retiring? Retiring sets are available until June 30th. You can access the list on my side bar or through my demonstrator website under the promotions tab.

The Retiring Accessories are only available until the product runs out. Some items are on sale for up to 50% off! Click here to see which accessories are retiring and the ones that are on sale, or contact me and I will e-mail you a list.

Contact me today (home ph# 925-256-9708, e-mail mtmuhl@pacbell.net) to place your order or you can shop directly from my demonstrator business website!