Monday, November 22, 2010

Soccer Thank You Card


The boys had their team party for soccer and of course I made the coaches' thank you cards. This is a card layout I've used for many team coaches and it is easy to produce! I'm so glad Concord Crush is an In Color this year because it was an exact match to the boys' uniform color.

Supplies:
sets- I love Soccer (retired), Wonderful Words (retired)
cs- whisper white, basic black, concord crush
ink- concord crush, basic black
access- 1-3/4" & 1-1/4" circle punches, blender pens

Happy Stamping! Mary

Thursday, November 18, 2010

Happy Birthday Cheryl!


My good friend, Cheryl, had her birthday on Sunday, too. I celebrated with her last week, when the boys had off school. Our son's had Subway sandwiches and played baseball while we went to lunch and then stamped. I wanted to use my new Aviary set that she'd given me for my birthday last month. I also wanted to make a clean & simple card. I lined up the clear mount birds on a larger block and colored them with markers. What do you think?

Supplies:
sets- aviary, teeny tiny wishes, occasional quotes
cs- whisper white
ink- melon mambo, tempting turquoise & daffodil delight markers
access- daffodil delight taffeta ribbon, turquoise ribbon (retired), melon mambo ribbon (retired), basic rhinestone jewels

Happy Stamping! Mary

Tuesday, November 16, 2010

Surprise Papa!


My Father-in-law turned 75 Sunday and my mother-in-law threw him a surprise party. She pulled it off and he was totally surprised. The first photo is the picture board I put together for his party. He is pictured with my boys and my cousin's daughter in the photo above.


This is the card I made him. It's a pop-up gift card holder. I had never tried it before, but remembered seeing one on Ruth's blog at least a year ago. So after searching I found where I had seen it. She has a link to Michelle's blog with a video tutorial, so I won't repeat how it's made. I actually like other gift card holders better, so I probably won't make this type again. The front of the card was inspired by one I saw here. I layered 12 square punch outs on a 5-15/16" x 4" piece of chocolate chip card stock, wrapped ribbon around the front, and layered it on a river rock card.

Supplies:
sets- it's your birthday, brushstroke numbers (both retired)
cs- river rock, textured wild wasabi, apple cider dsp (retired)
ink- Chocolate chip
access- ribbon (contraband), sticky strip, 1-1/4" square punch

Happy Stamping! Mary

Friday, November 12, 2010

Happy Bithday Chris!


My son is 14 today! Wow, where did those years go? He's not having a party for his b-day. Instead he's getting SCUBA certified. I think Dave's anxious to have a new partner (since I can no longer dive due to my MS).

Anyway, I wanted to make him a special card, and this is what I created. It's a treat cup card (he loves candy) and it has a scuba theme. It's based on the treat cup card I made with my club last fall (click here to view previous post).

I bought the Suzy Zoo scuba duck years ago through SU, before they started only selling exclusive SU stamps by their own designers. The other supplies are all SU, but some of it's retired.

Happy Stamping! Mary

Monday, November 8, 2010

Nov Club Projects

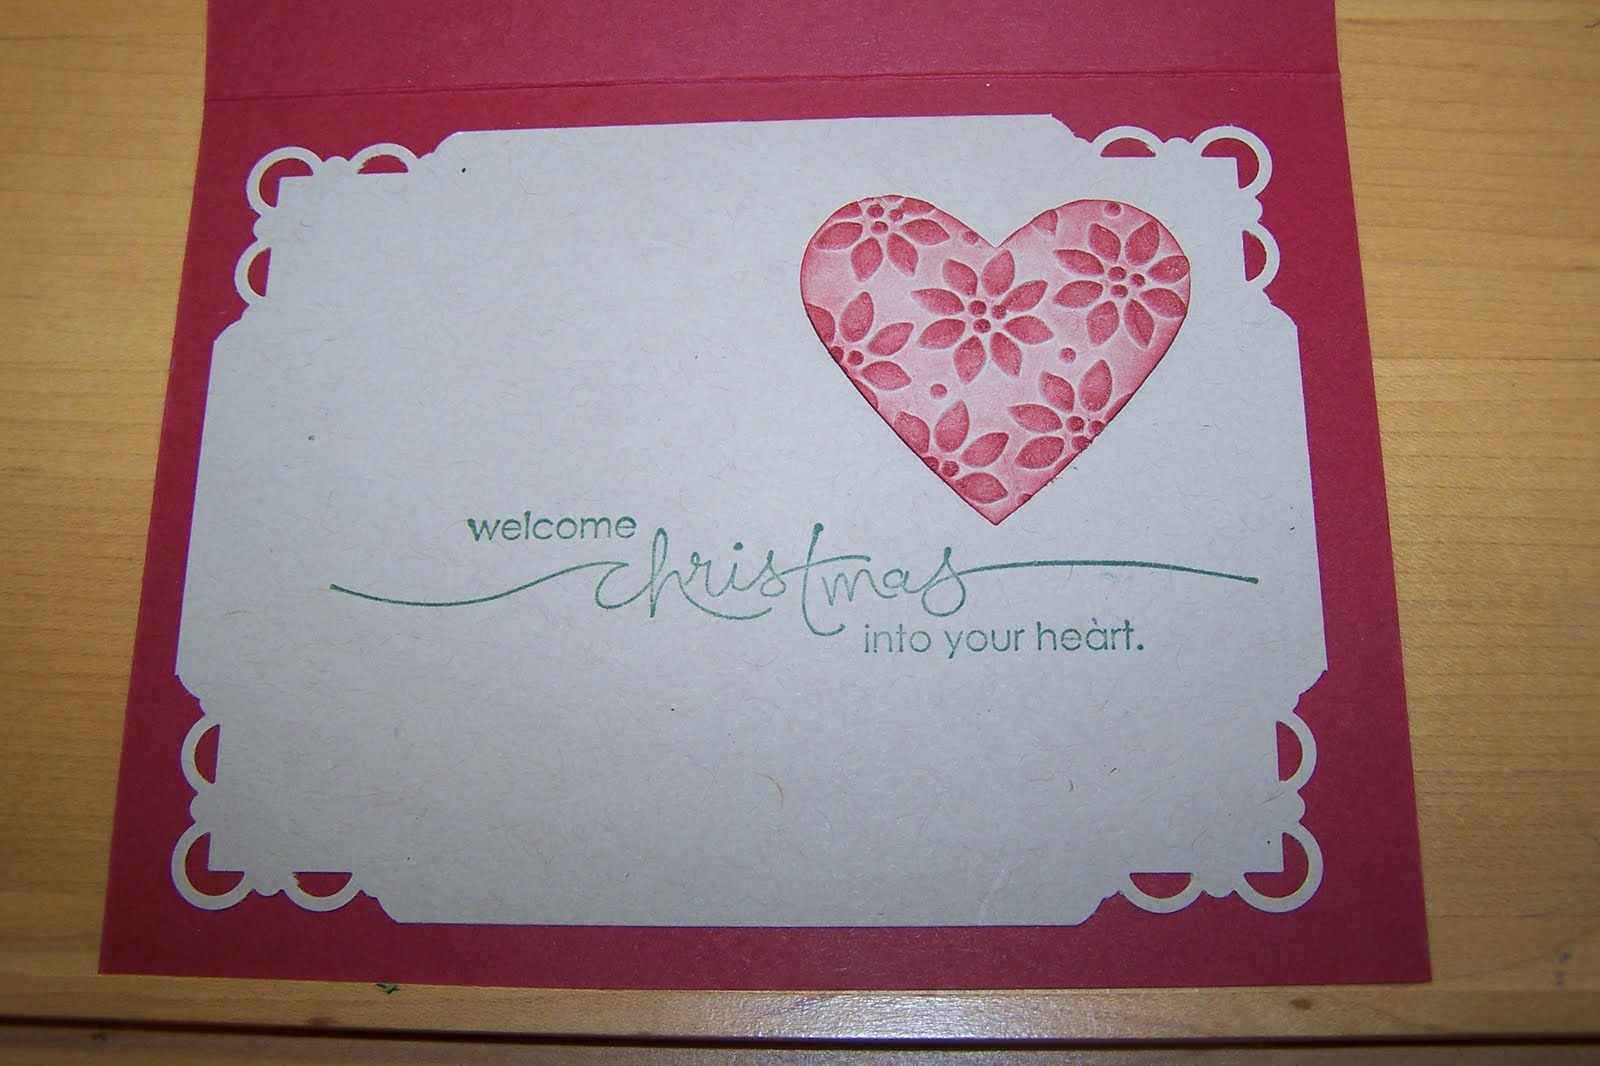
Here are the Club projects we made Sunday. The first card we made was originally designed by my friend Cheryl and I changed a couple little things to make it more "Christmassy". Isn't it just darling?

Supplies:
sets- heard from the heart, simply said
cs- cherry cobbler, crumb cake, garden green, riding hood red, ruby red pattern dsp scraps (for wing)
ink- riding hood red pad, garden green pad
access- petals-a-plenty embossing folder, big shot, scallop trim corner punch, full heart punch, sponge dauber, dimensionals, 2-way glue


The second project was a card with an interior box. I got the idea from a friend, who'd sent me something similar for Valentine's Day years ago. She got the idea from some lip balm. So I designed this to use half a sheet of cs for the exterior card and half a sheet for the interior box, plus a small piece for an optional lid. For our project I decided to make the box shorter, so it's more square. Then my ladies would only have to wheel once across. I also thought of trying to have the bear wear a "santa" suit, so we punched it out with the small tag punch and then punched the tag with the new 3/4 x 15/16" oval punch so the suit fits under the bear's chin. My club ladies dubbed the oval punch "chin" punch.

Supplies:
sets- under the stars, tags til christmas, button bear (retired)
cs- white, real red, black, crumb cake
ink- real red pad, jumbo ink cartridge and marker, black pad, garden green pad and marker, night of navy marker
access- silver tinsel trim, red grosgrain ribbon, Christmas chatter jumbo wheel, sticky strip, mini glue dots, dimensionals, scotch tape, punches- scallop trim border, small tag, 2-3/8" scallop circle, ornament punch, 3/4 x 15/16" oval & ticket corner


These are the same types of boxes, but with a more regular size card (it uses 8-1/2" x 5-1/2" cs for the outer card).


Happy Stamping! Mary

Thursday, November 4, 2010

Big Shot Techniques


People could do either ribbon treatment on this card, but I think everyone chose the first one with the jumbo eyelet.


Here are the cards we made in today's class. Plus we learned 4 background techniques: Polished stone, marble rolling, rubber band, brayer with waxed paper resist. I need to go to bed now so I'll edit this with supplies later. Good night! Mary

Saturday, October 30, 2010

Stamp Therapy X-Mas Tags


Last Fri a number of ladies came over. I gave them each 6-1/2 sheets of card stock, a half sheet of Big Shot Adhesive, some silver and gold cord and some silver tinsel trim. I had a few Christmas sets, punches, and ink pads on the table. They brought their own paper cutters and snail. I showed them how to make this cute "pizza" box to hold x-mas tags. They then made a bunch of tags to fill their boxes. Stampin'Up is offering several holiday "bundles" of product at reduced prices. Ask me and I'll be happy to tell you more about it.


Smile everyone! We know you love stamping and creating.

Happy Stamping! Mary

Friday, October 22, 2010

Christmas Stamp-A-Stack

We had so much fun at my Christmas Stamp-A-Stack class. There were six card designs. The ladies could make a "short stack" (6 cards), a "full stack" (12 cards), or a "super stack" (18 cards).

I had the idea for this first card, but it took a while to take shape. I thought the owls from the Aviary set have that "doe in the headlights" look and I thought it'd be funny to put them together under some mistletoe. I think the embossing folder really made it look rich and put together. I love the Aviary set that my friend gave me for my b-day - Thanks Cheryl!
#1 Supplies:
sets- aviary, teen tiny wishes
cs- real red, whisper white, wild wasabi
ink- wild wasabi spot, real red marker, blender pen, crumb cake pad, chocolate chip pad
access- big shot, petals-a-plenty embossing folder, dimensionals, wide oval punch, 13/16 x 3/4" med punch, dotted scallop ribbon border punch


This is one of my favorites because it's so easy - yet elegant! It looks better I.R.L.
#2 Supplies:
sets - Seasonal Sentiments, heard from the heart, sweet season
cs- white
ink- cherry cobbler
access- big shot, northern flurry embossing folder, basic jewels


The third card uses the set I bought to make my Christmas cards, which I still haven't designed. I referred to the Color Coach to pick the bashful blue/marina mist color combo. Then I had to throw in some naturals ivory for "sand".
#3 Supplies:
sets- come to bethlehem
cs- bashful blue, marina mist, naturals ivory
ink-marina mist
access- dimensionals, paper snips, clear rhinestone brads, 1/16" handheld circle punch


This elegant card uses the "glitzy glitter widow" technique. You punch a hole and stamp your image through the hole. Then you colver your hole witha piece of clear packing tape so the sticky side faces out(I got a type you can tear with your hands from the grocery store). Finally, add dazzling diamonds glitter to the tape. We stamped the snowflakes on the front with white craft ink. The ladies could emboss them with iridescent ice for added sparkle.
#4 Supplies:
sets- serene snowflakes, occasional quotes (hostess set)
cs- night of navy, whisper white
ink- white craft pad, night of navy pad
access- dazzling diamonds glitter, whisper white organza ribbon, iridescent ice ep, 1 3/8" circle punch, clear packing tape


The swirl image is embossed. I love how that tinsel trim from the mini has wire in it. It's so easy to add to your card!
# 5 Supplies:
sets- baroque motiffs, tags til Christmas, come to bethlehem
cs, sahara sand, rich razzleberry,
ink- garden green craft spot, basic black pad
access- clear ep,ornament punch, tinsel trim, daffodil delight taffeta ribbon, scallop trim border punch


This was our final card. I love that reindeer! The waffle paper gives it texture and the baroque wheel lends elegance as does the tiny pearl that dots the "i" in Christmas. Can you see it?
#6 Supplies:
sets- dasher, grateful greetings
cs- very vanilla, gold waffle paper, cherry cobbler
ink- gold encore pad
access- top note die, big shot, gold ep, baroque wheel, basic pearls


Here are some variations I made of the above card


Happy Stamping! Mary