Sunday, February 26, 2012

SAB Short Stack Class

We had a fun class last Thur. It was full of product that can be earned FREE during Sale-a-bration and product from the Occasions Mini catalog. Everyone made two cards each of four designs for a total for eight cards. For each card design there was a "simple" version and a "stepped up" version.


Project 1 Scented Embossed Card. For this card the "stepped up" version was the colored card and we embossed the image with the vanilla scented ep. They also got to add a cute butterfly brad (SAB item) or a neutrals 5/16" brad,or a pearl, like on the simple version.

Supplies:
sets- fresh vintage, kindness matters
cs, riding hood red, very vanilla, everyday enchantment dsp
ink- riding hood redclassic and craft pads, chocolate chip classic and craft pads
access- big shot & labels collection framelits, 1/16" punch, 5/16" brads (neutrals or sab), pearls, riding hood red pleated satin ribbon, sticky strip, 2-way glue pen, embossing buddy, heat tool, and vanilla scented embossing powder

Project 2 Embossed Hello Card. For the stepped up version we simply added rhinestones to the crown and between the butterflies.

Supplies:
sets- Elementary Elegance
cs- crumb cake, blushing bride, basic black
ink- versamark pad
access- embossing buddy, black embossing powder, heat tool, blushing bride stitched poly ribbon, rhinestones, big shot and stripes ef, dimensionals, curly label punch


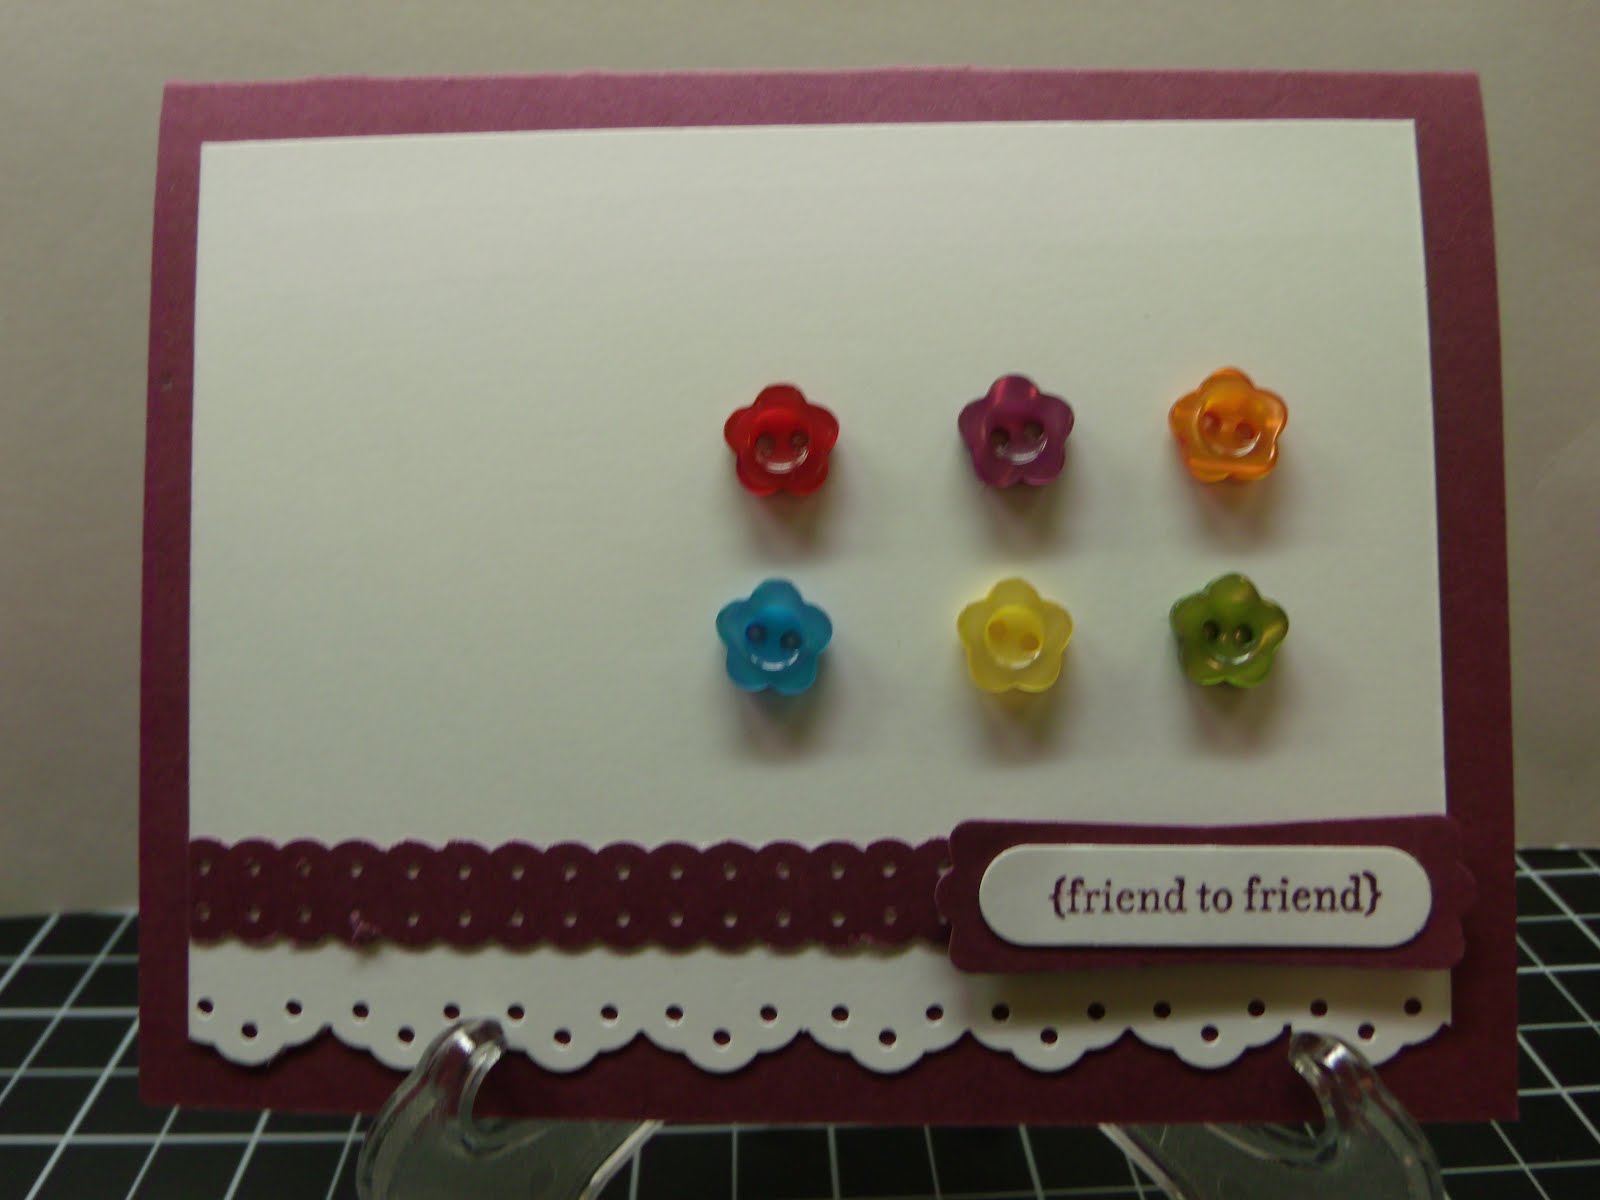
Project 3 Button Card. For this card customers could had their choice of card color (daffodil delight, real red, old olive, pumpkin pie, rich razzleberry, or tempting turquoise), sentiment, button style, and border style. To make a "stepped up" version they could run the white piece through the big shot with a subtle texture plate (not pictured).

Supplies:
sets- Teeny Tiny Wishes
cs- colored card and scraps for punching, white
ink- color to match card
access- glue dots, brights designer buttons, dimensionals, big shot & texture plates
punches- word window, modern label, dotted scallop ribbon border
choice of border punch- scallop, scallop trim, eyelet or pinking hearts


Project 4 Blossom Punch Card. This is one of my favorite cards. For the simple version (not pictured) the dsp wasn't cut and embossed on the big shot with the Adorning Accents edgelits and ef. A piece of Baja Breeze seam binding covered the edge of the dsp. Also the flower had a stamped center popped up on a dimensional instead of a brad.

Supplies:
sets- mixed bunch, petite pairs, triple treat flower
cs- calyoso coral, lucky limeade, very vanilla, everyday enchantment dsp
ink- poppy parade and soft suede pads
access- big shot and adorning accents edgelits and ef, everyday enchantment brads, mat pack and paper piercer, blossom and five petal flower punch, dimensionals, sponge, painter's tape, optional.

Happy Stamping! Mary

Wednesday, February 22, 2012

Poppy Parade Punched Blossom


This is one of my favorite cards that we made at my Inkerbelles get together in Walnut Creek. It's so much fun to go to these demonstrator meetings! We talk, get prizes and make sample cards. And it's all free! Thanks Tami!

I love the Enchanted dsp and brad and ribbon pack that you can get FREE during SAB. I also love the Mixed Bunch set and coordinating Blossom punch from the Occasions Mini catalog. We will be using these items (in a different way) at my class on Thur. I hope you are signed up!

Happy Stamping! Mary

Tuesday, February 21, 2012

Easy Button Layout


This is a sneak peak at one of the cards wes'll be making in my SAB Short Stack Class this Thur. Customer will have their choice of card color, sentiment, border punch, and button style. They can also step up the card by texturizing the white layer. I like it plain myself. The Brights collection of designed buttons can be acquired for FREE with a qualifying Sale-a-bration order.

Happy Stamping! Mary

Monday, February 20, 2012

Saturday, February 18, 2012

ink - rue des fluers


This is one of the cards we made at the Inkerbelles Jan demo get together. It's a simple layout and the elements can be easily changed to create many different looks.

Mary

Tuesday, February 14, 2012

Happy Valentine's Day!


I love the new framelit dies, especially the labels collection. I wish I could take credit for this card, but I can't. My friend Cheryl designed it.


I made these two cards at the Inkerbelles demo meeting I attended in Jan and thought they would be good to share with you today. I wish I had photos of the cards we made in Vacaville because there were a couple cute heart ones, maybe I'll just share them late. Anyway, hope you have a loving day! My hot date is to watch my son's Freshman basketball game. Then we'll stay to watch the JV and Varsity games, too. Go College Park High School!

Monday, February 13, 2012

Buttoned Up Heart


My upline sent me this card and I thought I'd share it with you today. You can get the brights designer buttons FREE as a Sale-a-bration item. I hit my nogan this morning and boy did that hurt! At least no stitches were required and I don't have a concussion. I didn't do anything today but sit around and read, which was good on a rainy day! I have a great Valentine to share with you tomorrow, so be sure to check back!

Mary

Sunday, February 12, 2012

SUO Valentine Challenge


The SUO Challenge this week was to make a Valentine using two colors. Well, I also needed to make a Valentine for a friend's 2 year old grandson who is very ill with a rare disease. My mom suggested I make a pop-up one, which I thought was a good idea. I pulled out one of my favorite retired stamp sets (Unfrogettable) and some retired paper (green galore and pink passion). Unfortunately, I had to get it in the mail before I had a chance to take a photo. So I decided to make a similar card for my two boys. I'll give them on Valentine's Day with some See's candy (which will probably be their favorite part). I used the 2-3/8" scallop circle punch so the frog looks like hes on a lily pad. I also used the 2-1/2" circle punch in white to set it off and the heart to heart punch. It was fun and I hope you enjoy it. Now I have to see if I'm not too late to submit it to the SUO challenge!

Happy Stamping! Mary

Thursday, February 9, 2012

Designer Frame Window, portrait


This is a card I made using a technique I don't use very often ~ coloring with pastels and blender pens. You dip the blender pen in the corner of your pastel and color in your image. - It gives the soft look of pastels but allows for just a bit more precision in your coloring. I love to punch a window and then stamp through it. This card took it one step further ~ I punched the oval window and then embossed around it using the designer frames textured impressions embossing folder. You can get the e.f. for FREE with a qualifying S.A. B. order! Originally I made this card for an SUO challenge, but I didn't get it posted in time. This week's SUO challenge is to make a Valentine card using two colors... /can I get it done by tomorrow?

Supplies:
sets- elegant thank you, bordering on romance
cs- whisper white, twitterpated dsp
ink- island indigo
access- blender pens, pastels, pearls, big shot, designer frames textured impressions embossing folders, extra large oval punch, blushing bride pleated satin ribbon (I love this ribbon!), sticky strip (the best way to adhere the ribbon)

Happy Stamping! Mary

Thursday, February 2, 2012

February Club Projects


Project 1

Supplies:
sets- I (heart) hearts, Pursuit of Happiness
cs- whisper white, wisteria wonder, concord crush
ink- concord crush pad
access- big shot, stripes ef, heart to heart punch, pinking hearts border punch, flirtatious fabric, dimensionals, pearls


Project 2 Hexagon Box

See earlier post for supply list and tutorial

Happy Stamping! Mary

Wednesday, February 1, 2012

Hexagon Box Tutorial

We made these fun hexagon boxes using the Mini Milk Carton die and the Big Shot in Club Wednesday. They hold about 25 chocolate kisses. Of course you could easily fill them with something other than candy. You can use any color card stock and embellishment to meet your needs. Wouldn't they be cute as a bridal shower or baby shower place setting favors?

Supplies:
sets- none
cs- wisteria wonder, concord crush, whisper white
ink- none
access- big shot, mini milk carton die, stripes embossing folder, crop-a-dile, sticky strip, dimensionals, liquid glue or two way glue pen, pearls, heart to heart punch pinking hearts border punch, small oval punch, 2-1/2" circle punch

Start by cutting out 2 of the Mini Milk Carton die. I save card stock by only cutting out three panels, being sure to include the side tab on each piece. Note: If you cut out the full milk carton die you will need to cut off the panel without the side tab on both pieces.

Score the center panel of both pieces to match the outer panels (upside down "v"). I found it easiest to use a ruler and my bone folder.


Add sticky strip to the side tab of each piece on the outward facing side (right side). Add sticky strip to five of the bottom flaps on the inward facing side (wrong side).

Remove the protective layer of the sticky strip and adhere the two "milk boxes" together so you now have six panels.

Using your Crop-a-dile, punch 1/8" holes just above the narrow scored line at the top of the box. You can fold over the card stock and punch two at a time. You'll have to punch the last two after the final tab is adhered (forming the cylinder).

If you are decorating the six panels, it's easiest to do that now while you still have a flat shape. If you are going to add a single strip of dsp that wraps around the entire box (about 1-3/4 x 11") you can do it after the box is formed.

Adhere the other side tab to make a cylinder.


Turn your box upside down. Being careful to keep the hexagon shape, fold in and adhere the bottom flaps. Start with the flap that has no sticky strip on it and the flap opposite that one. Continue with the flaps that are opposite each other, lining them up parallel and overlapping the ends about 1/4" helps keep the hexagon shape.

Weave some kind of string or ribbon through the holes to close your box. I used Wisteria Bakers twine, about 24", but the 1/8" taffeta ribbon works well, too.

I used the handle for the Sweet Pressed Cookie stamps from SU to press a 2-1/2" circle into the bottom of the box for added strength and a cleaner look.


Happy Stamping! Mary